You can either run the archetype from the command line (and then import into Eclipse if using m2eclipse), or run the archetype using m2eclipse straight off.
Navigate to the parent directory of the project (that holds the parent pom.xml). The directions here are for the examples/claims project.
TODO: Naked Objects 4.0.0 released examples/claims as org.nakedobjects.distribution:examples-claims. In 4.0.1 (the plan is) for it to be released as org.nakedobjects.examples:claims. In the screenshots that follow I've hacked the 4.0.0 pom to change the groupId and artifactId. However, I've provided the command that kicks the whole thing for both 4.0.0 and 4.0.1
To run the archetype from the command line (against NOF 4.0.0):
$ cd $NO_HOME/examples-claims
$ mvn archetype:generate \
  -D archetypeCatalog=http://starobjects.sourceforge.net/m2-repo/snapshot \
  -D archetypeGroupId=org.starobjects.tested.fitnesse \
  -D archetypeArtifactId=archetype \
  -D archetypeVersion=1.0-beta-3-SNAPSHOT \
  -D groupId=org.nakedobjects.distribution \
  -D artifactId=claims-fitnesse \
  -D parentArtifactId=claims \
  -D package=org.nakedobjects.examples.claims.fitnesse \
  -D version=4.0.0
or against NOF 4.0.1:
$ cd $NO_HOME/examples-claims
$ mvn archetype:generate \
  -D archetypeCatalog=http://starobjects.sourceforge.net/m2-repo/snapshot \
  -D archetypeGroupId=org.starobjects.tested.fitnesse \
  -D archetypeArtifactId=archetype \
  -D archetypeVersion=1.0-beta-3-SNAPSHOT \
  -D groupId=org.nakedobjects.examples \
  -D artifactId=claims-fitnesse \
  -D parentArtifactId=claims \
  -D package=org.nakedobjects.examples.claims.fitnesse \
  -D version=4.0.1
The groupId:parentArtifactId:version tuple should correspond to
the parent pom (so, for 4.0.0, that is
org.nakedobjects.distribution:claims:4.0.0, and
for 4.0.1 it is
org.nakedobjects.examples:claims:4.0.1). Note
that the parentArtifactId is not one of the standard Maven properties,
instead it is an additional property mandates by the Tested Objects'
archetype. (The archetype uses this property to derive the names of
some the other projects to include in the dependencies).
The artifactId then is the artifact of the FitNesse project
being generated, so is typically
parentname-fitnesse (so here:
claims-fitnesse).
The output is shown below:

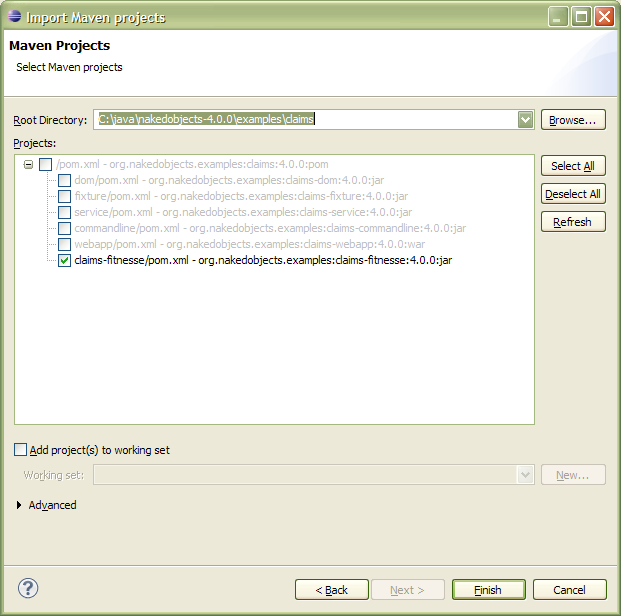
This will generate a claims-fitnesse directory, and update the parent pom.xml file.
We can then import into project into Eclipse, using File > Import > Maven

As an alternative to running the archetype from the command line, you can instead run the archetype using m2eclipse.
However, m2eclipse does not (seem to) understand partial
archetypes, and so the project cannot be generated in a subfolder of
the parent project. Instead, I recommend you create the project
alongside the parent (eg in
examples/claims-fitnesse).
TODO: These notes are slightly incomplete; it is also necessary to specify the archetype catalog in the Windows>Preferences. However, m2eclipse 0.9.8 (the latest 'stable' version at the time of writing) fails to pick up snapshot archetypes from remote catalogs. The workaround is either to use the command line once (this will copy the archetype into your local repository) or alternatively achieve the same thing by building the FitNesse code from scratch, as described in the developers' guide.
So, use File > New > Project, then Maven > Maven Project to bring up the wizard:

Specify the directory. Note that this cannot be a directory that contains a pom.xml file.

Select the archetype. (Note that the screenshot here shows the archetype in the "Default Local" catalog ... that's because I've built the archetype from source. ).

Specify the groupId, artifactId (eg
claims-fitnesse), version and package. Also
specify the parentArtifactId as the parent project's artifactId (eg
claims):

Hit Finish and you will be in more-or-less the same place as if you had generated the archetype from the command line and then imported. The only thing different is that the new fitnesse project will not be in the parent project's modules.
Therefore, navigate to the parent project's
<modules> region, and add:
<modules>
    <module>dom</module>
    <module>fixture</module>
    <module>service</module>
    <module>commandline</module>
    <module>webapp</module>
    <module>../claims-fitnesse</module>
</modules>
The instructions in the wiki do assume that you have done this.